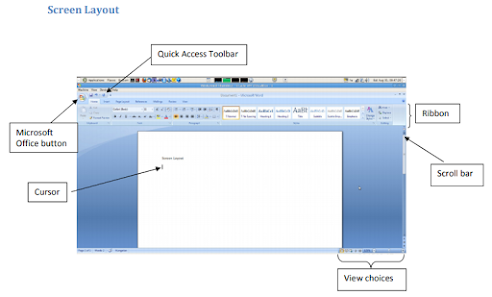
The Microsoft Office Button
You click on it to see these options: New, Open, Save, Save As, Print, Prepare, Send, Publish and Close.
The Ribbon
The Ribbon is the panel above the document. It has seven tabs: Home, Insert, Page Layout, References, Mailings, Review, and View. Each tab is divided into groups. The groups are collections of features designed to perform functions. Commonly used features are displayed on the Ribbon, to view additional features within each group, click on the arrow at the bottom right of each group. A blue information box will pop up just below where you stop your pointer.
Home: Clipboard, Fonts, Paragraph, Styles, and Editing.
Insert: Pages, Tables, Illustrations, Links, Header & Footer, Text, and Symbols
Page Layout: Themes, Page Setup, Page Background, Paragraph, Arrange
References: Table of Contents, Footnote, Citation & Bibliography, Captions, Index, and Table of
Authorities
Mailings: Create, Start Mail Merge, Write & Insert Fields, Preview Results, Finish
Review: Proofing, Comments, Tracking, Changes, Compare, Protect
View: Document Views, Show/Hide, Zoom, Window, Macros
To remove the toolbar, right click on the blue section beside the Ribbon. Choose Minimize the
Ribbon. To view again, do the same.
Quick Access Toolbar
The quick access toolbar is a customizable toolbar that contains commands that you may want to use frequently. You can add items to it. Right click on any item in the Office Button or the Ribbon and click on Add to Quick Access Toolbar and a shortcut will be added to the Quick Access Toolbar.
Moving in the text
The Cursor
The cursor is the short verical flashing line on your screen.
• The cursor shows you where you will start typing in a Word document.
• When you are using the Tools in Microsoft Word your cursor will change to an arrow. This is called a pointer.
Scrolling
• Your scroll bar is at the right-hand side of your screen.
• Click on the up/down arrow to go up/down the page.
Hold down the left mouse button to scroll up and down the screen more quickly.
Using the Keyboard in MS Word
• The arrow keys on your keyboard move your cursor around.
• To make a letter a capital letter:
• Hold down the Shift and the letter key at the same time.
• For the signs on your keyboard:
• Hold down the Shift and the number key at the same time.
• The Shift keys are on both sides of the keyboard.
• The Space bar makes spaces between words when typing. Tap the bar one time to make a space.
• Use the Enter key to move your cursor to finish the line and make a new one.
• The Backspace key deletes everything to the left of the cursor.
• The Delete key will erase everything to the right of the cursor.
• To make the cursor go to the end of the line press End.
• To make the cursor go to the start of a line press Home.
• To make the cursor go to one page up/down press Page Up/Page Down.
• To make the cursor go to the top/end of the document press Ctrl+Home/Ctrl+End.
Selecting text
• Put the cursor at the beginning or end of the words you want to select.
• Put your finger on the left mouse button.
• Hold down the left mouse button.
• Move the mouse across the words.
• Lift up your finger.
• The word will be highlighted in blue. When this is done, you can move words or change the size, the colour, and the style of the words on the computer.
Alternatives
To select a word, double click within the word.
To select a paragraph, triple-click within the paragraph.
To select the entire document: Home/Editing/Select/Select All or press Ctrl+A
To Deselect
Click your mouse on any WHITE part of the page to deselect.
MS Word practical notes
Basic actions with documents
Create a New Document
There are several ways to create new documents, open existing documents, and save documents in
Word:
Microsoft Office Button / New / Blank document
Opening an Existing Document
Microsoft Office Button -> Open -> Choose from the list
Saving a Document
Microsoft Office Button/ Save or Save as
or
Press Ctrl+S on the keyboard,
or
Click the File icon on the Quick Access Toolbar
Working on Multiple Documents
Several documents can be opened. All open documents will be listed in the View Tab of the Ribbon when you click on Switch Windows. The current document has a checkmark beside the file name. Select another open document to view it.
Document Views
• Print Layout: This is a view of the document as it would appear when printed. It includes all tables, text, graphics, and images.
• Full Screen Reading: This is a full view length view of a document. Good for viewing two pages at a time.
• Web Layout: This is a view of the document as it would appear in a web browser.
• Outline: This is an outline form of the document in the form of bullets.
• Draft: This view does not display pictures or layouts, just text.
• To view a document in different forms, click the document views shortcuts at the bottom of the screen or:
• Click the View Tab on the Ribbon
• Click on the appropriate document view.
Close a Document
Microsoft Office Button / Close


